Drainage for the Terrace and the construction of the
Terrace itself.
“Terrace” pronounce “teh- rass” is just a poncy French way of
saying “patio” isn’t it?
I might be awry with that observation as I am not
sure about the sizes and what the rules are regarding the square meterage when
a patio become a “Teh rass”. That said I prefer it to “patio” which sounds dreadfully
suburban middle class England to me and I would be mortified to be mistaken for one of that mob. .
Anyway enough of my little peccadillos regarding the
vagaries of language and class system because it is of little consequence regarding the creation of our terrpatioase.
After we had dug down to the rough levels required and laid the scalpings at approximately the correct angle to take any rain water away from the house once the slabs are fitted on top. We then had to make a decision about the surface of said terrace and also the drainage form it.
After we had dug down to the rough levels required and laid the scalpings at approximately the correct angle to take any rain water away from the house once the slabs are fitted on top. We then had to make a decision about the surface of said terrace and also the drainage form it.
We need to be able to drain the terrace and
substantial rear roof of rainwater so it had to receive some serious thought as no open ditches or drains in place for it to go to.
We have opted for two drain channels (I don’t know
their proper name) with metal tops that have to be laid into and level with the
terrace (or more accurately the terrace will be laid around and level with
them)
These take water from the drain pipes (and also any
water that falls on the terrace) in a V formation from the house to a central
sump and then via land drain to a large soak away.
From the other side of the soak away, and just lower than the input, there is more land drain (the yellow stuff with holes in it wrapped in a silt proof blanket) that will go around the garden for a while slowly dropping to the field level behind our garden. I will diffuse the final outlet by another stone filled soak away on the edge of our border so as not to p!ss off the farmer by sending a torrent of rainwater out into his crops every time it rains.
From the other side of the soak away, and just lower than the input, there is more land drain (the yellow stuff with holes in it wrapped in a silt proof blanket) that will go around the garden for a while slowly dropping to the field level behind our garden. I will diffuse the final outlet by another stone filled soak away on the edge of our border so as not to p!ss off the farmer by sending a torrent of rainwater out into his crops every time it rains.
It has been a bit of a palarva so far becasue once I
scraped the topsoil off the ground it is either crappy rock or clay. I have had
the digger at full stretch down in the ground and cant get past the clay to aid
the soak-away so it has to be given another route out hence the extra land
drain .
We are having two railway sleepers as the step up
from the terrace so first we had to set them at a level that made a decent step
and then make sure the drain channel would fit underneath them.
I then found a concrete sump and cut a hole on one
side to allow the water out.
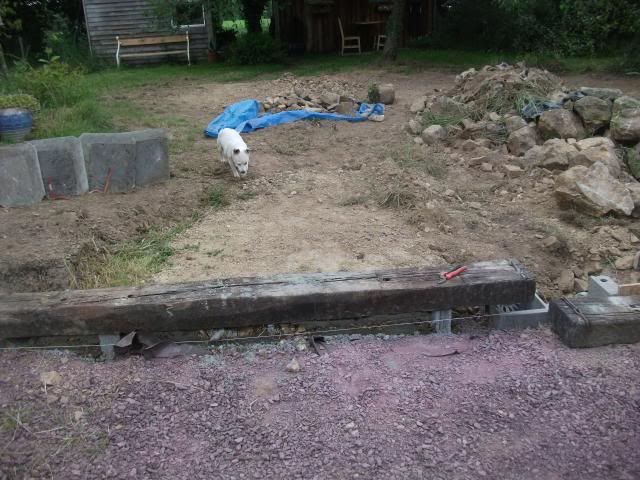
Here you can see the process of the using blocks to get the sleepers
level and the sit at height above the concrete sump to allow the drain channels to fit underneath.

The string line gives us a nice straight edge to make it all look neat when the slabs go down.

I will explain about the bizarre looking concrete block structure on the left later on.

Here is the trench and the start of the hole for
the soak away. The trench is lined the bottom with throw away stones to help spread the
drainage. Then it is smiple case of putting thye land drain on the stones and use a spirit level to make sure the angle is right to allow water to flow. The angle used is about 2 cms per meter drop. It runs for another length of pipe and then drops into a stone filled h
You can see the first piece of land drain in place with its silt and root protective blanket which is a sort of nylon material thick membrane .
You can see the first piece of land drain in place with its silt and root protective blanket which is a sort of nylon material thick membrane .

Here is the digger reaching down into make the hole bigger. They are just random sized old stones that were not going to be used in the wall. The size of the hole is about 1.5 meters down from the inlet and about 1.5 square.


Here are the sleepers in situ with the back fill complete for the drain you can see the plastic pipe running into the concrete sump, the entrance I cut with an angle grinder.
I fitted a piece of guttering plastic pipe about 300 long into one end of the land drain which I fixed into the sump by splaying out the ends and using a couple of tubes of silicon and “Weather Mate” to seal in place. I then set the whole thing in water proof cement to make sure it was fixed.

You can see the cement surrounding the sump and also the gap beneath the sleeper step and the sump that will take the drain channel This means the top of the drain channel will be level with the top of the terrace which will be level with the bottom of the step (phew) which is the desired effect.

And here are the two drainage channels in place. They go off to the two drain pipes and end up central to the steps, which lead to a small curved area which in turn is stepped up with natural stone onto the garden.

Hopefully you can see now how the terrace slabs will be laid up to level with the top of the drain channels. The drop from the house to the drain is about 1cm a meter and also there is a slight drop in from the sides to ensure that all water ends up in the drain channels.
Looking at the photos and knowing how I made a metal cover for the channels under the sleepers to prevent any soil etc from slipping in I realise that I was a bit liberal with the weather mate and so will have to move the sleeper steps back out in order to be able to clean the drain out should it ever become clogged. No big deal as MrsB has not built her wall over the end of them as previously planned. To help prevent clogging (leaves etc) I will be putting some rolled up chicken wire in these last bits before connecting the rest of the drain channel.

Next up the slabs
No comments:
Post a Comment